We’re currently celebrating our house’s thirteenth birthday (thirteen years with us) and its 128th birthday on this street. To watch and read about the whole process in those early years (pre-blog), check out our rehab slide shows, nine of them, here.
…..
I’m sorry that I continually drag you back into this attic time and time again, but it’s still the beginning point for a few more spaces so bear with me. Now we’re headed into this middle space.

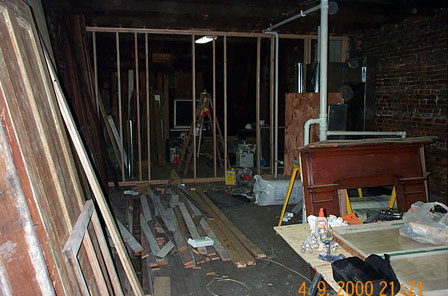
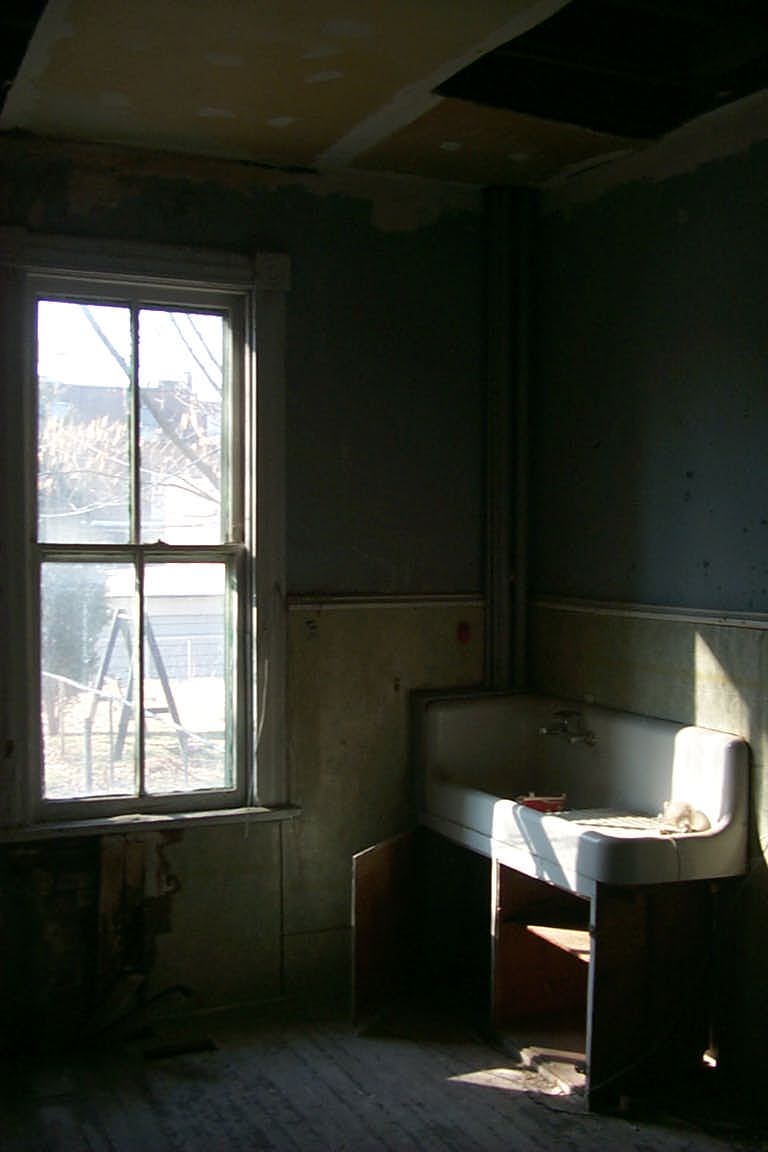
The third floor of our house is not as big as the other two floors. Essentially the footprint of this house is three rooms, all in a row, shotgun style. The first and second floors are identical (remember they used to be two separate units), but only the front two rooms of the three extend up to the third floor. So that back room on the second floor – the den / studio space – has no room above it – just a roof. Which meant we needed to get two bedrooms, a stair hall, and a bathroom into a space the size of our living room and dining room. Even though there were no windows on the third floor when we bought the house – there were three window holes – the front dormer window, and then the side window in E’s room and a side window in F’s room. If you look closely in the photo above you can see the dormer window in the far distance, and the roughed in PVC pipes for the bathroom to the right. The photo below shows a boarded up window that would eventually be in F’s bedroom.

Even though we weren’t doing any finished work up here in 2000, we still needed to have a rough idea of how the future spaces would work out because we had to locate mechanical equipment in the attic, and we also needed some of the PVC pipe rough-in installed in the future bathroom because the toilets in the rooms below needed to be vented through the roof. We scrambled during the first eight weeks of 2000 to get signed and sealed bid documents together for the initial work and to satisfy the conditions of our construction loan. But even after we completed that, we couldn’t relax – we still had to draw up the third floor to a certain degree. And it wasn’t as simple a puzzle as the more straightforward floors below.
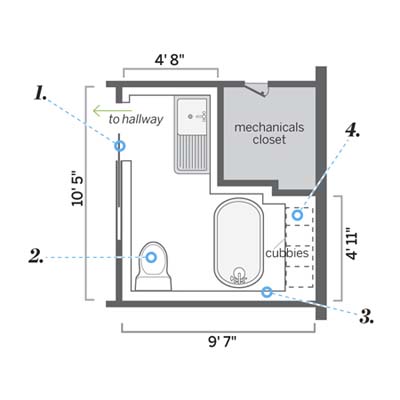
I grabbed this plan (below) that we made of the bathroom to help explain the layout. Ignore the numbers for now – those were added in a certain publication we’ll discuss later.
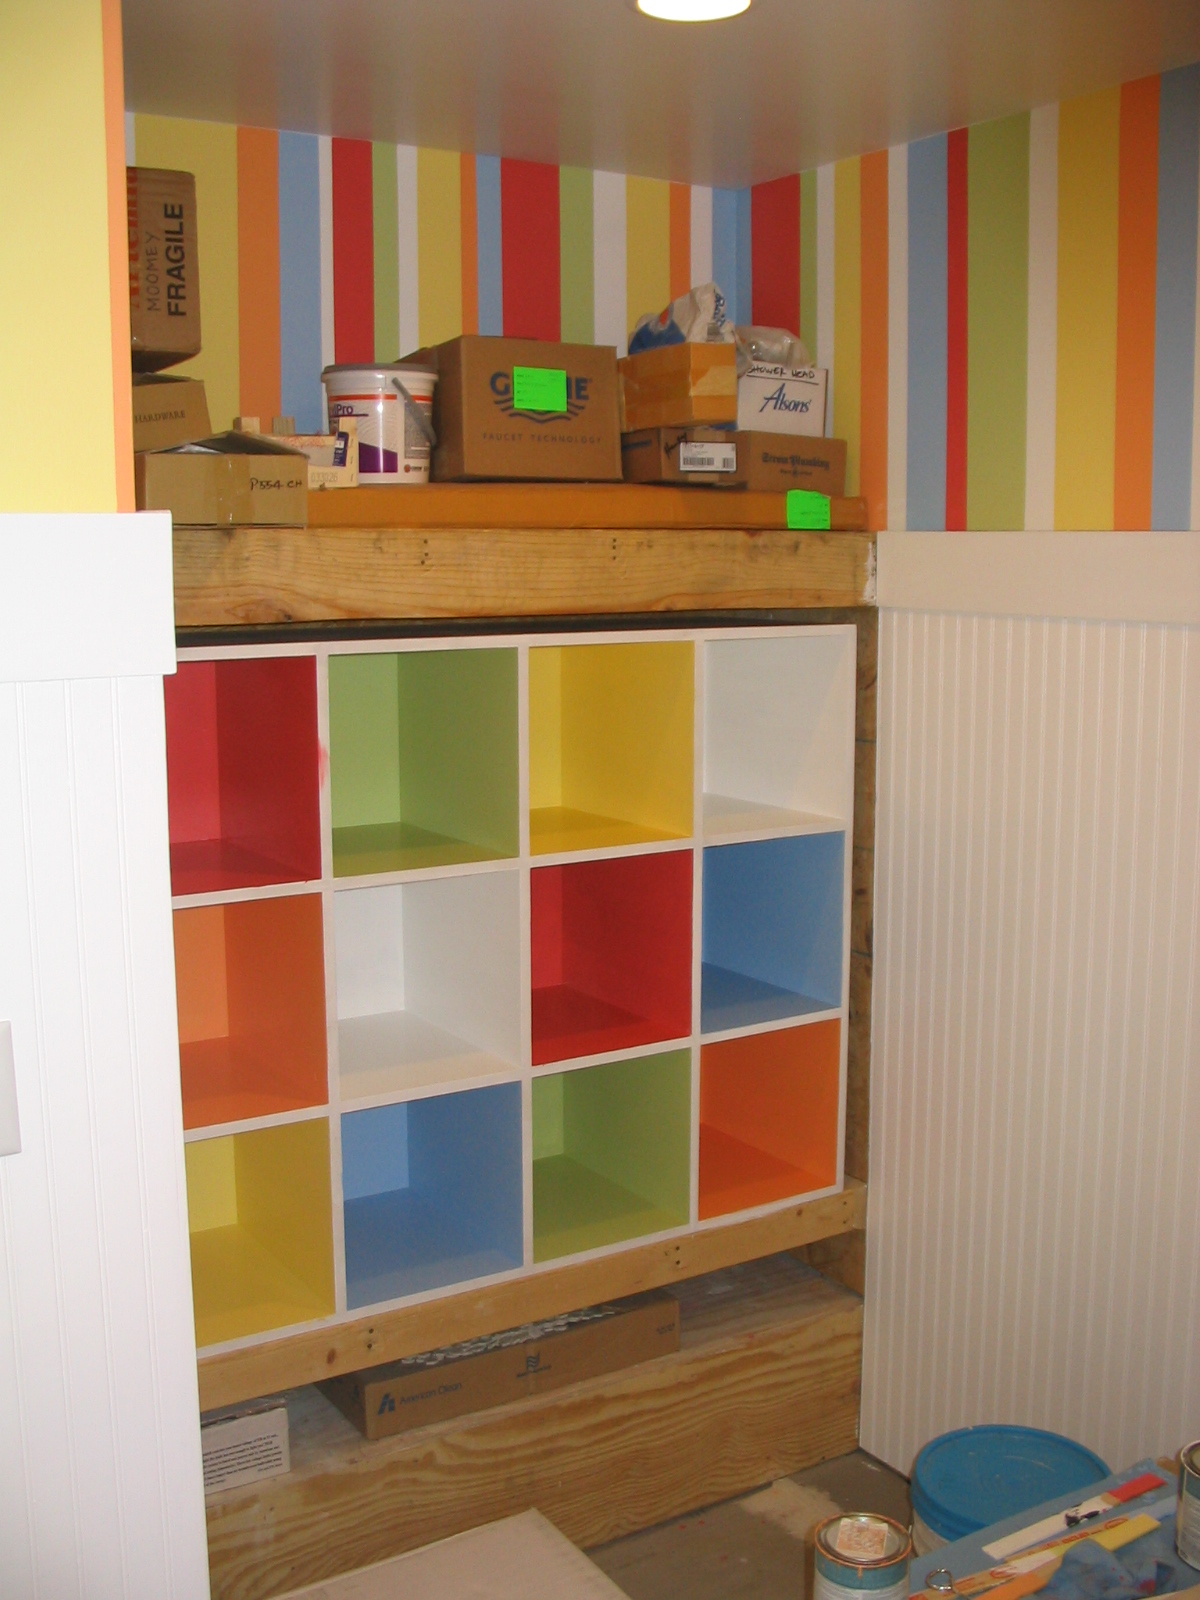
In the floor plan you can see the mechanical closet in gray – that little swing door is actually that hole to the left of E’s bed that we filled in with the custom bulletin board and bedside ledge. That furnace serves the second and third floors, and to avoid soffits in the rooms below we chose to run the ductwork on top of the attic floors for the entire east side of the building. The ductwork then drops below when needed and across the lower rooms in the space between the joists. The idea was that we would then build a platform for the length of the house as well to cover that ductwork in both bedrooms and in the bathroom – and we’d custom build wardrobes to be installed over that platform. If you go back and look at E’s room you’ll notice two supply air grills below the wardrobes – that’s the area where the ductwork runs.
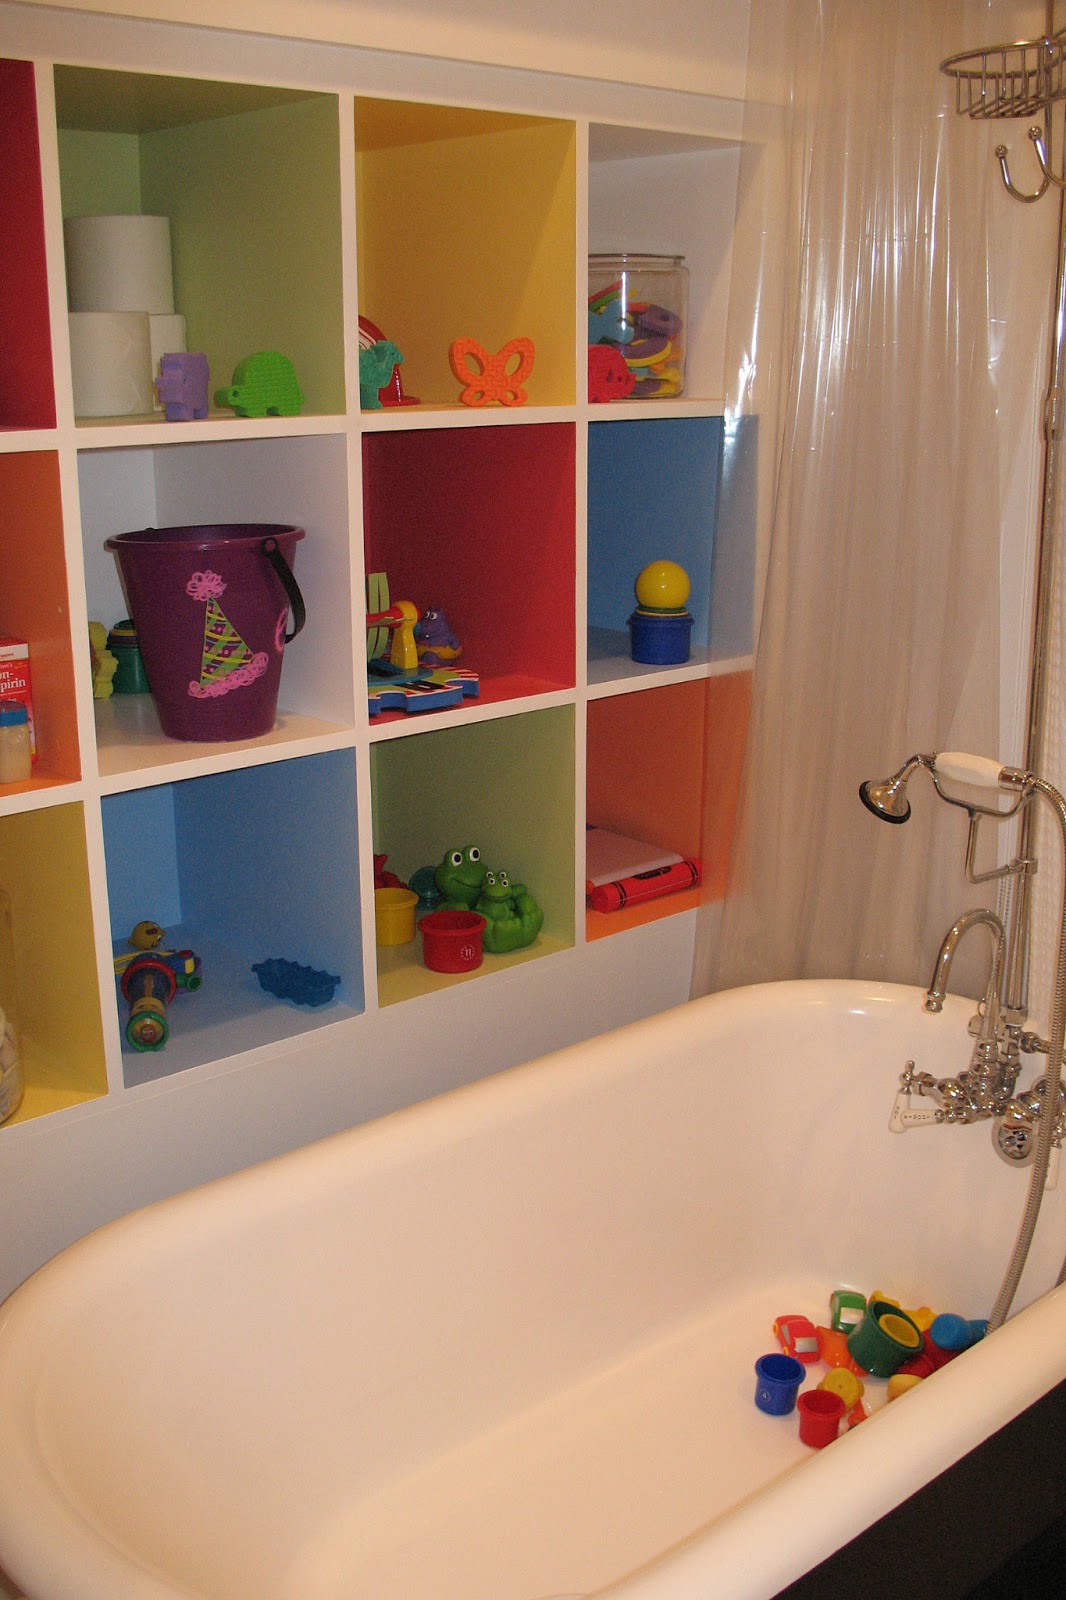
When you get into the bathroom you have that same platform condition, but instead of wardrobes in this room we opted to do open cubbies for bathroom storage. We were also planning to reuse two existing fixtures from the original house – a pint-sized pedestal tub and an oversized farmhouse sink with drainboard from one of the kitchens. Because the sink is so large, we couldn’t comfortably swing a door into the room, and we didn’t want a bathroom door swinging out of the room either.
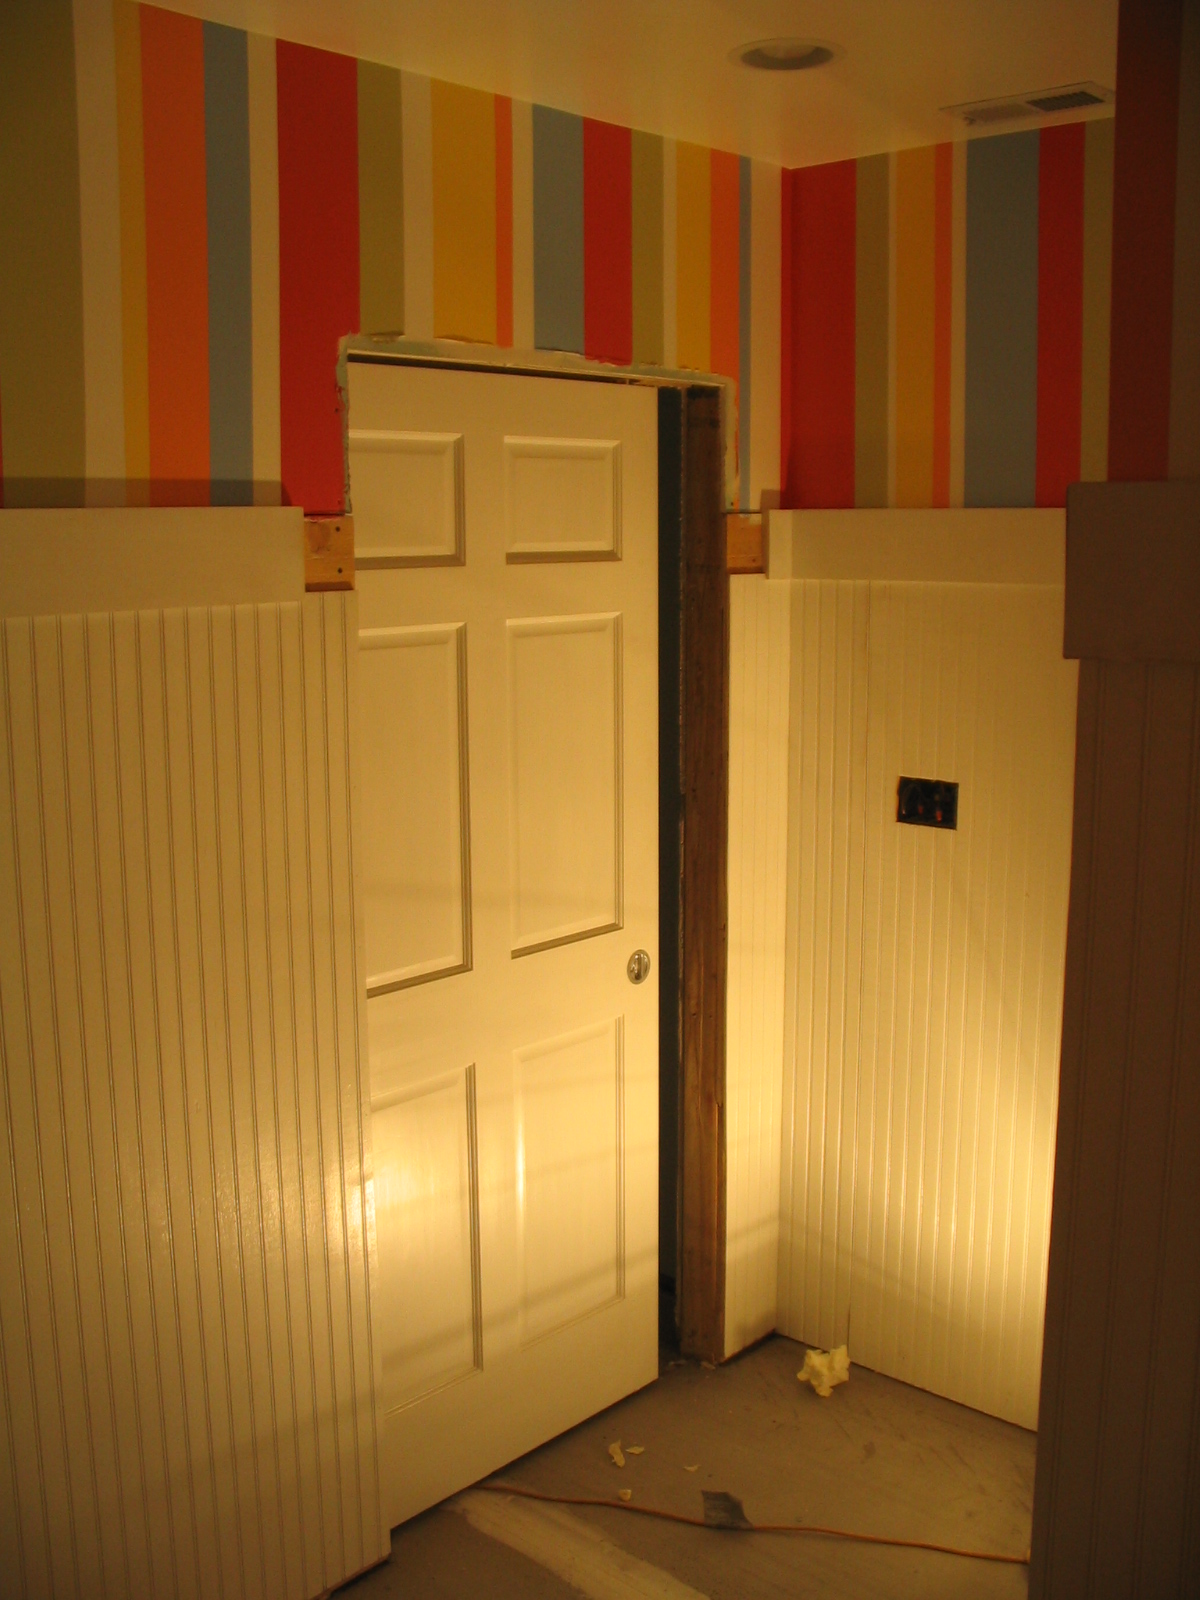
So we took an existing door we had, bought a conversion kit for a sliding door, and pocketed it into the wall. This actually works great in here. It can still close for privacy – like when we have guests and they sleep up here – but 99.9% of the time it stays open and tucked out of the way. Because everyone with small children knows this: they don’t give a hoot about privacy.
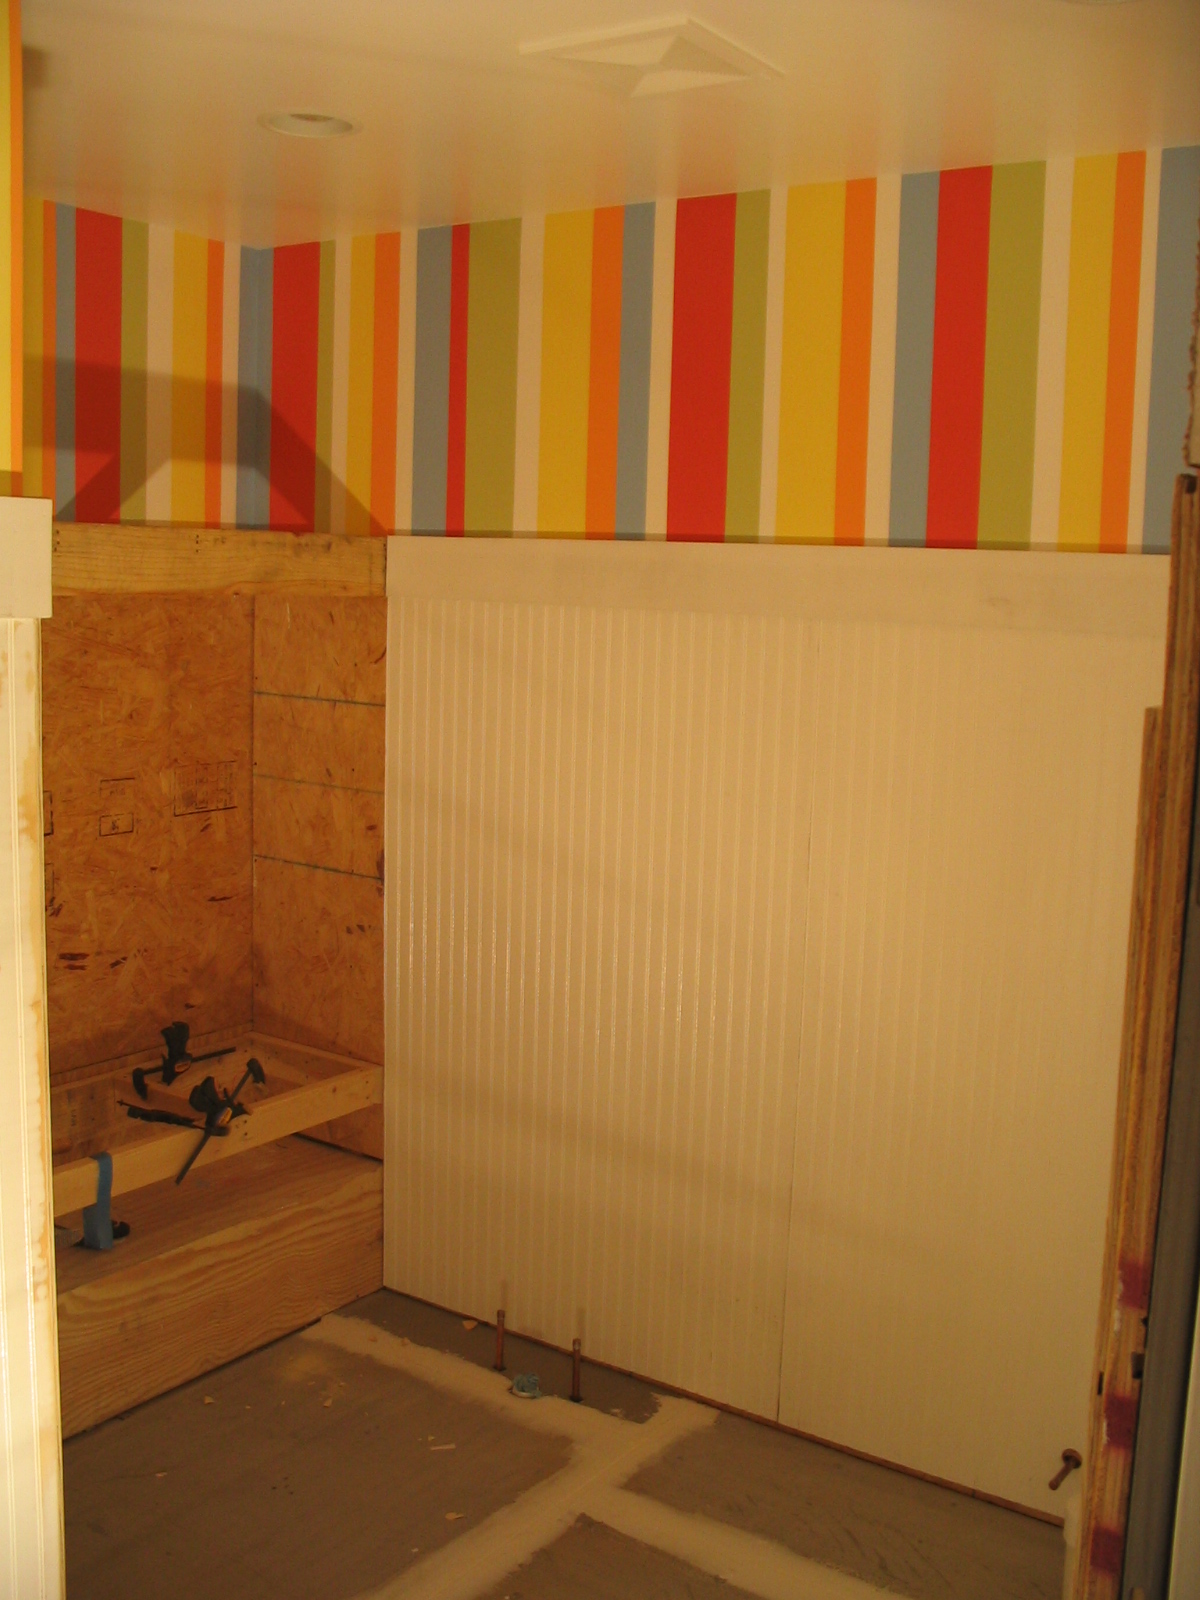
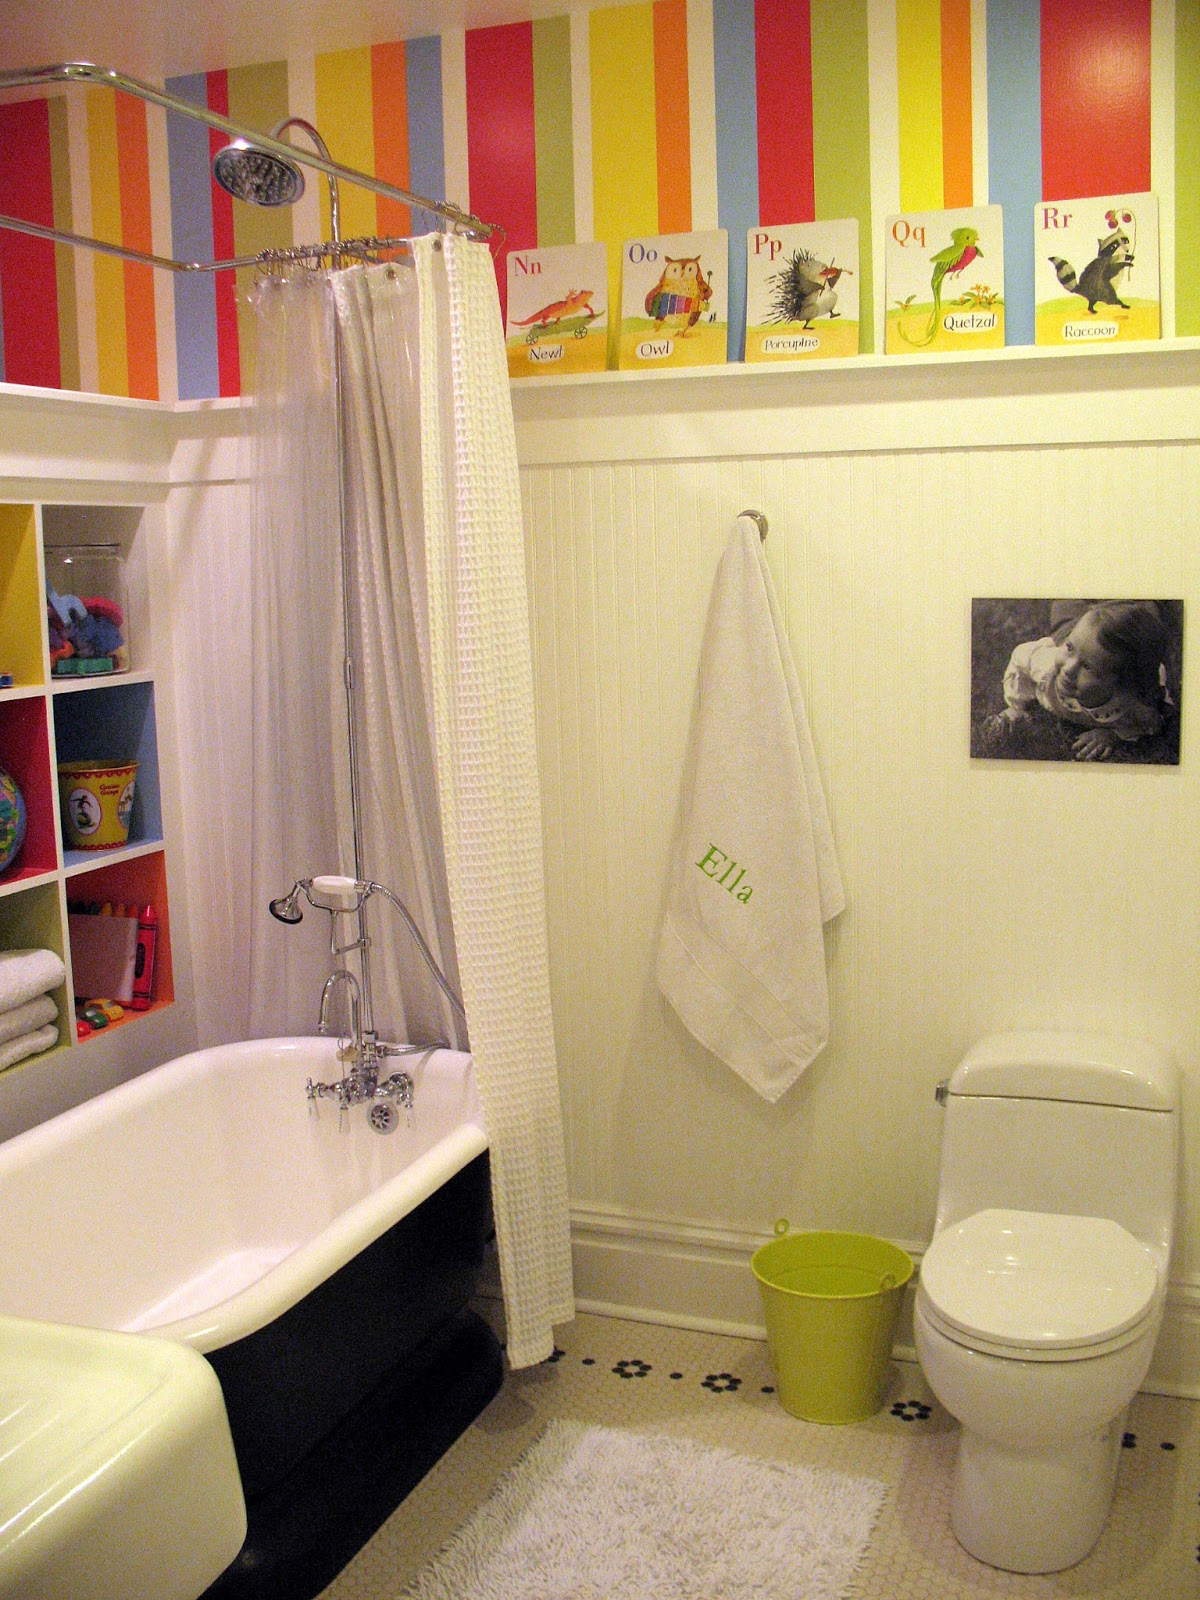
I have surprisingly few photos of the early progress in this room. We did the drywall in here before E was born because I remember being very pregnant and climbing up the ladder (while my sister carefully spotted me), painting those stripes on the wall. We painted the ceiling a crisp white in semi-gloss and have many recessed light fixtures as well as a sconce over the sink to compensate for the lack of natural light in this room. The next few photos were taken with just a shop light on, but we were trying to bounce a lot of light in there with all the white surfaces, and it really does work.

M installed the wainscoting and a portion of the top rail (a narrow picture ledge was to follow) – in the photo below you can see the gaps around the door, waiting for new trim. Speaking of new trim – once we got up to the third floor we had no more salvaged trim reserves to draw upon, so we had to purchase new trim. Luckily there are several planing mills in the area, and one in our own neighborhood has the knives to cut a matching baseboard and casing trim for our house. The base trim is a stock item, but the casing requires a setup fee, so we made sure to plan ahead for all we needed and ordered at once. Not having to have a custom knife made too saved us some dough. Still, the baseboard trim is three pieces, and nine inches tall, so even with a trade discount it’s still over four dollars a linear foot which adds up.

In the next picture you can really see that lower platform that houses the ducts at the bottom, and then the cubbies that we installed above it. We raised the cubbies up enough to be close to the top of the tub – it would have been strange to have storage below the edge of the tub, I think.
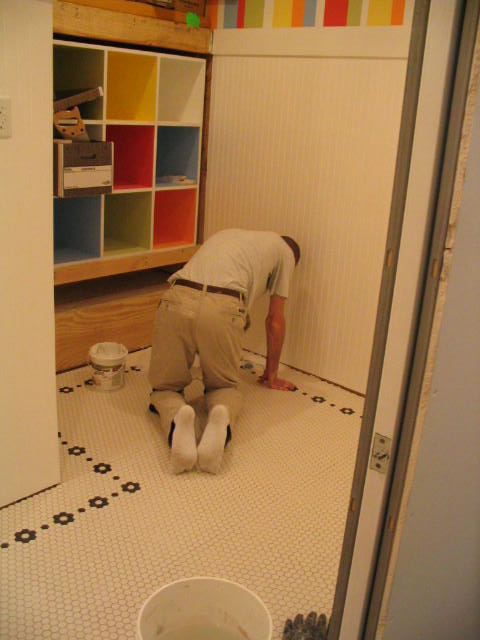
Next it was time to decide on a pattern for the black and white hex tiles. This was the fourth and final room with this tile, and we didn’t want any pattern to be the same. This simple flower motif is actually a very common pattern for the era of the house, plus it reminded me of some of the painting I did in E’s room, so we laid it out and M got busy.
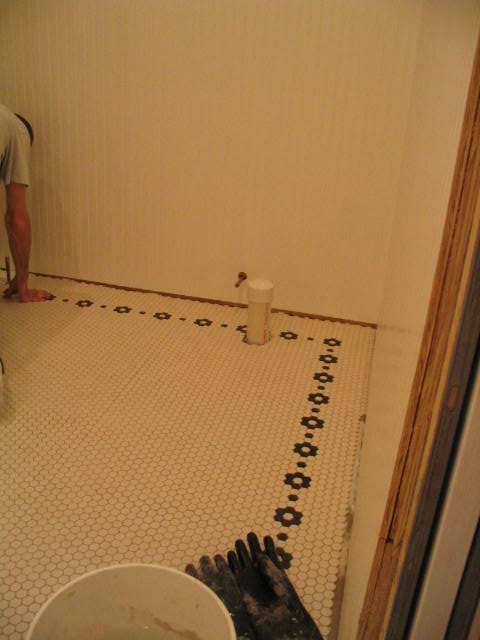
Here’s a nice shot of the tile pattern with the baseboard installed.
After the floor was complete, M trimmed out the cubbies and we got ready to install the plumbing fixtures.
Remember this sink?
Here is is, newly installed in the bathroom (before we had it refinished, so it’s still a yellowish color). This thing is cast iron, so it is heavy, and we prepared for this by installing heavy duty blocking in the wall, and having the guy that fabricated our steel stair components make a custom steel cleat to mount to the wall to hold it up. The sink is cast with its own cleat on two sides – the left and the back – so it just slid over the new steel. I think we left that saw horse in place for a few days anyway. We did not want this thing crashing through the floor and into our room. (And trust me – we did get over those early willies – that thing isn’t going anywhere.)

Next came the tub – I think it took three or four guys to carry this thing up from the basement. It’s not as big as the master bathtub, but it’s still several hundred pounds. I cleaned up, prepped and then painted the base of the tub black. Then we hired someone to come in and reglaze the tub and the sink. Reglazing doesn’t last forever – it’s supposed to give you five to ten years, and we have some chips in that surface now and we are nearing the end of the lifespan. So sometime in the near future we’ll likely hire someone to do it again. Even doing this once a decade beats out buying new fixtures – and I love the fact that we were able to reuse something from the original house. Plus, they are ridiculously cute.
Ah – that crisp white tub is better…
At some point my parents mentioned to us that
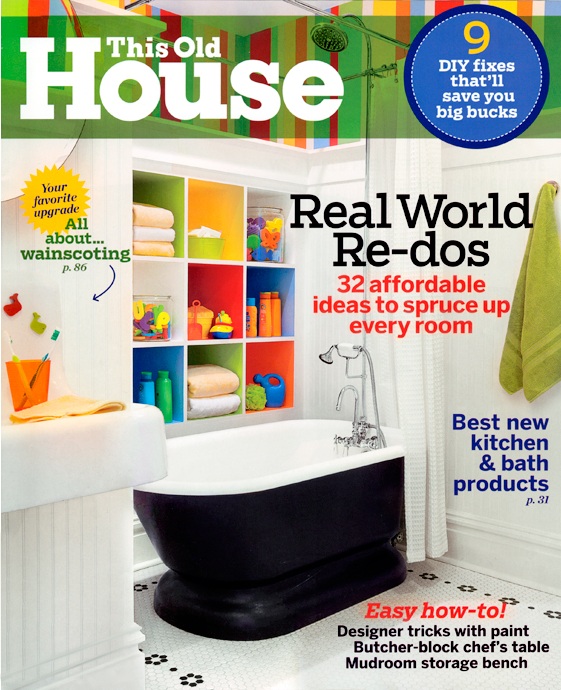
This Old House magazine was having a Reader Remodel contest, and they urged us to enter. I’ve talked about this before, but if you want to read more about the process, it’s
here. We entered E’s bedroom and bathroom into the contest, and also the mansard restoration in their curb appeal category.
We didn’t win the contest, but we did score the cover of their magazine. We cleared the room out so that the professionals could move in.
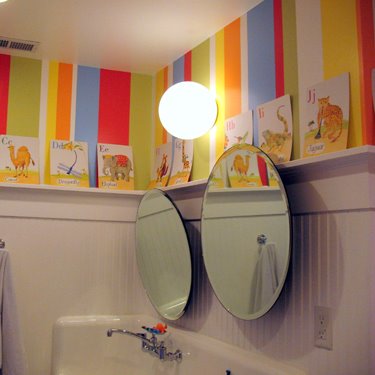
You can see the cute alphabet cards that we have on the ledge around the room…
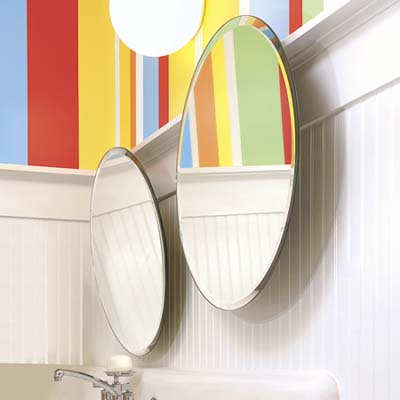
…those were just a few of the many things the stylist removed prior to photographing the space. (And to be clear, those were TOH requests, not the photographers.) Alise O’Brien was the photographer, and you can see how much better the right equipment and lighting and editing can make in a room when you compare her image below and mine above. Still, I love those cards.
So we had one cover…
… and then another. We may not have written the book, but it still made us a little giddy to see this in every home improvement store for months on end, and it was fun to have our friends and family around the country email us pictures of it when they ran into it somewhere.
I’m so proud of this room. It was a really tough room to lay out, and even tougher to execute. It was hard to get excited about having a room with no natural light, but in the end I think it really turned out so, so well. I surprised even myself with those bold stripes. That’s not generally my thing, and I worried that maybe it was the wonky pregnancy hormones that inspired them. But nine-and-a-half years later I still love them.
I’m also proud of this room because it does clean up well, and photograph well. It looked so cool on those covers, and it was fun to stop working on the house for awhile and give ourselves a little congratulatory pat.
But beyond being proud, I really just enjoy this room. It’s a room we use every day – every morning and every night, and I think it works so well for the girls. It’s cool that we were able to plan this room to work for two little people that didn’t even exist when we were plotting it out.
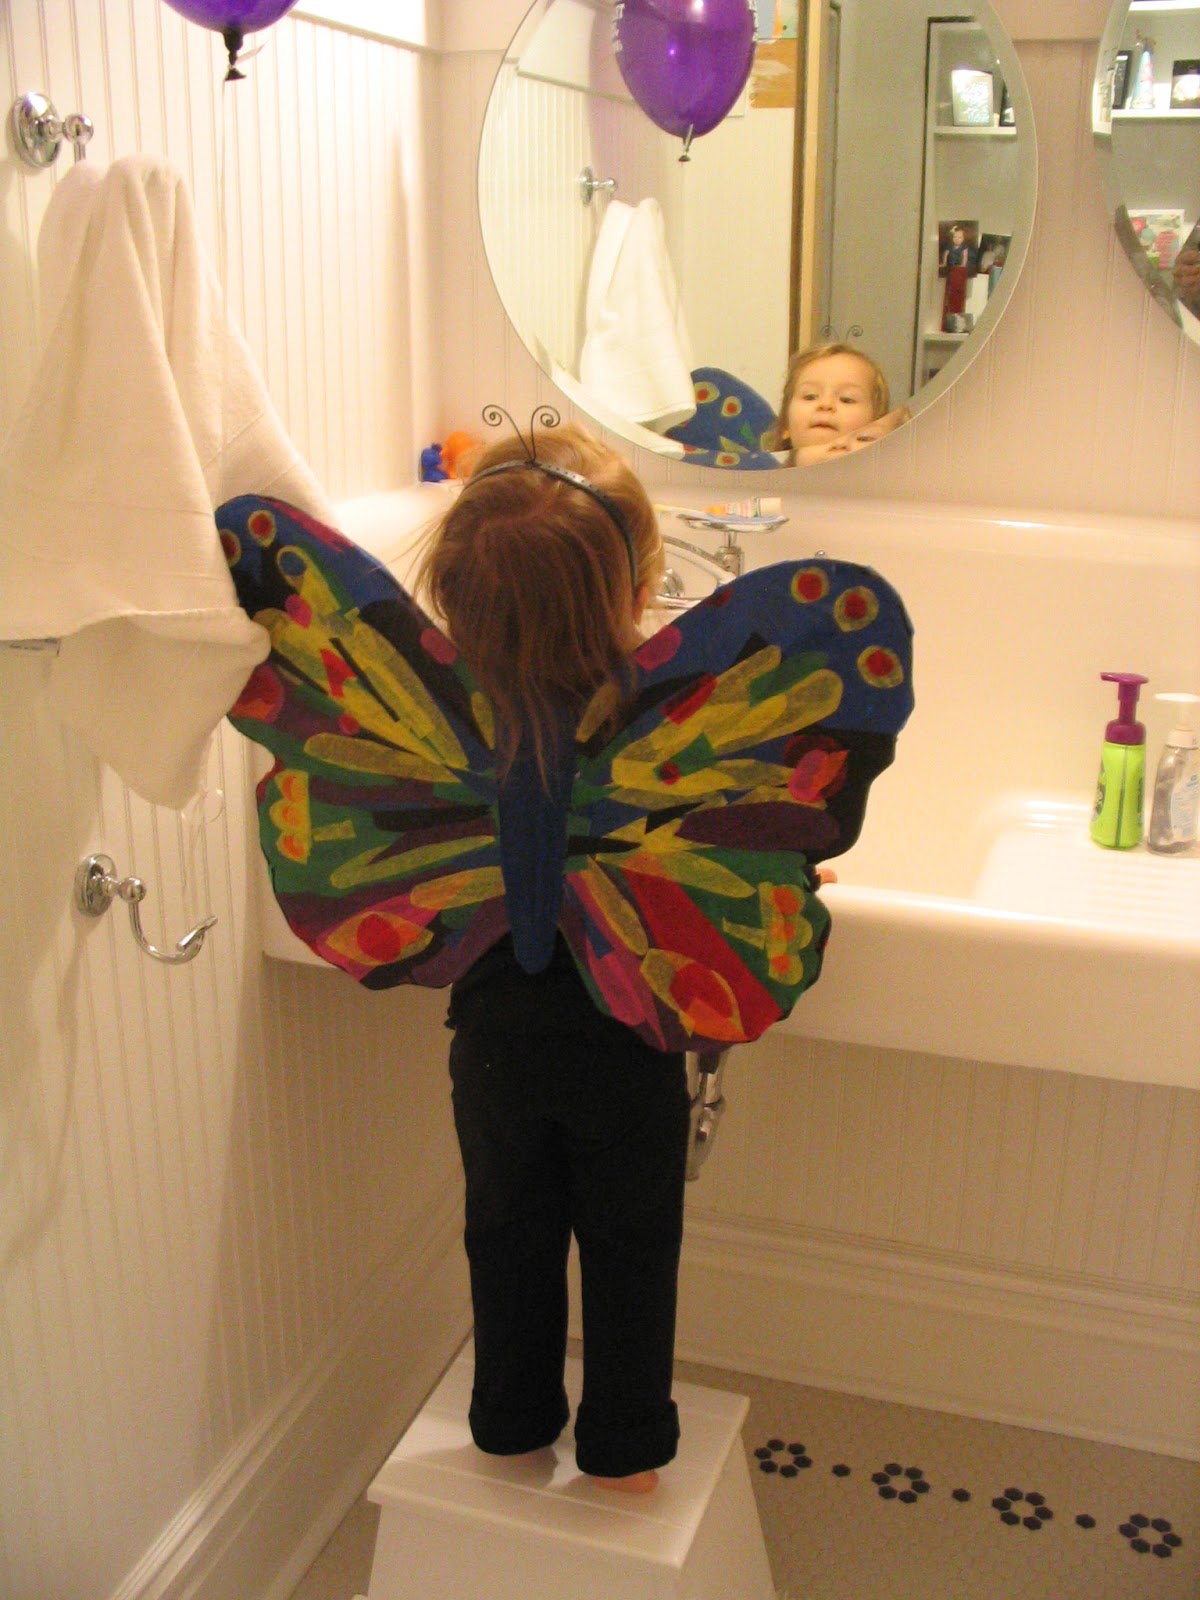
Plus, I have some really, really sweet memories of this place. Like this photo, the moment E tried on her newly finished Eric Carle butterfly wings (a Halloween costume) for the first time and she ran into the bathroom and stood on tippy toes to see herself in the mirror.
And of course there are countless photographs of damp haired babies sitting in that tub, and those tub moments are some of the most fun (and most photographed) memories.
Potty training, teeth brushing, bubble baths and bath bombs… we’ve spent a lot of time in here as a family – sometimes all four of us – and it’s big enough and comfortable enough to do it. Many fevers have been cooled in that tub, and the room has seen its fair share of stomach bugs. We’ve even de-loused one head of hair, and painted countless toenails, and wrapped up soft, squishy bodies in fluffy hooded towels, and rescued a fair amount of bouncy balls from the drain. I love this room and this space and how it works for us.