

I’m going to wrap these posts up because they feel like they’ve gone on for awhile, and the drawings following these dive deeper into the details. But I thought I’d share the building and a few of the wall sections that do offer a better understanding of how all of these spaces work together.

Upper Left: This is a section cut through the new addition, looking west, backyard is on the left. You can see the folding glass wall on the left, and the wood surround that frames that opening and provides some privacy and sun control to the interior. This is probably the most helpful building section because you can see that “link area” with the skylights in the roof, and the built-in refrigerator and freezer and dish cabinet that extend the galley kitchen another seven feet. You can also see a bit of the kitchen in this section too.
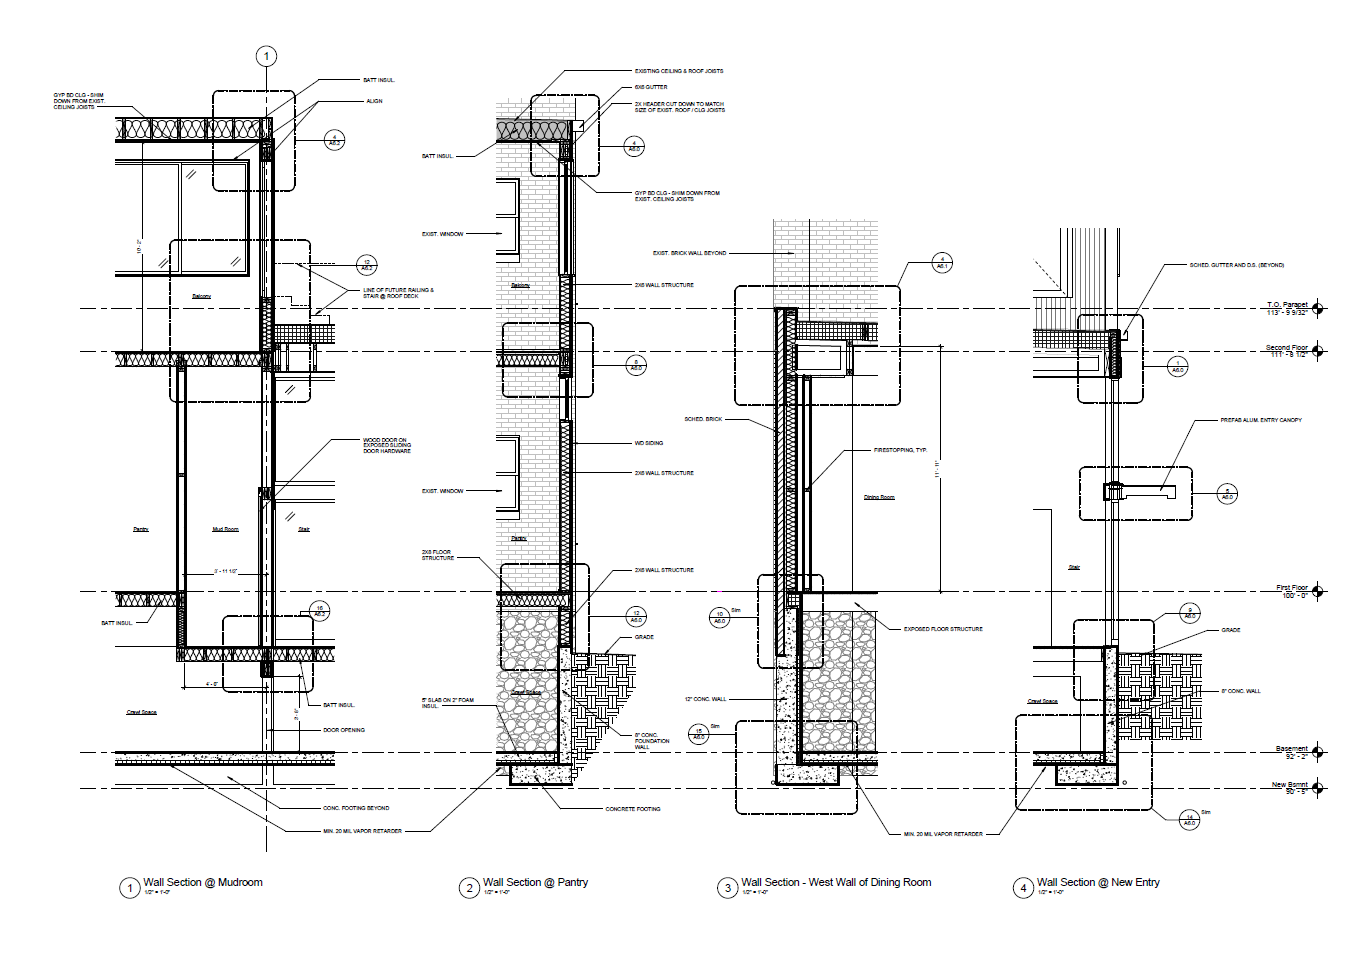
When you look at the lower level, you’ll see that shorter ceiling height at the base of the stairs in the link, where I mentioned before that we couldn’t undercut the original foundation which has a very short head height in the existing basement. But then the basement steps down 21″ from there, and the Den has a higher ceiling. Upstairs we’ll have a drywall ceiling, but downstairs we’ll leave the floor framing exposed and paint it all out white, so it will feel even taller without the flat ceiling. I think I forgot to mention this in the lighting post, but we’re thinking we’ll install a couple of surface mounted tracks to the underside of the floor and mount adjustable light fixtures to them. Mechanical ducts will also be exposed down here, so those will be spiral, and painted out white as well. Similar in feel to this photo.

Upper Right is cut in a similar spot, but is looking east, so just imagine you are pivoting around and looking the other way. You can see the enclosed Balcony on the second floor, the new Pantry area, the Stair landing, the adjacent Mudroom (see what I mean about the really tall ceiling?!), and the Dining Room on the main level, and Den on the lower level – with operable windows in both for ventilation. There is a decent amount of storage underneath the stair, with access to the crawl space under the Mudroom and Pantry.

I’m not sure it’s that valuable to go through all the rest of the drawings in great detail, but I put them here in case you are interested. I know there are more than a few architects that read this blog! (And my parents! They always like more drawings, not less!) Again, if you have any questions, just ask.
I plan to put together a few more detailed posts that show the interior elevations of the space, which will dive deeper into the kitchen and the stair details. Those will take a little more time to put together, but I promise to get to this soon. We’ve really focused most of our attention on how this jigsaw puzzle goes together – how to maximize the volume of the rooms – new and existing, how to maximize the daylight (and how to control it), natural ventilation, opportunities for green growing space, and how to solve those initial problems that I outlined initially as Objectives for this project. I’ve copied them here to refresh your memory:
1. Connect this big old brick house to the outdoors in a more modern, open manner.
2. Bring light into the center of the house.
3. Upgrade the kitchen into a serious cooking / baking kitchen – not a fancy kitchen, a hardworking kitchen.
4. Carve out a mudroom space to control clutter.
5. Provide an indoor connection to the basement / storm shelter.
6. Create an urban courtyard and a more private outdoor away space.
7. The table is a big part of our family life – create a dining space that celebrates that and also allows us to entertain larger groups of family and friends.
8. Build an alley garage with a future attic space for guests or studio space.
9. Create an informal hang out space in the new basement room – a spill over space from the main level for the kids when the adults are lingering around the table.
10. Bring light into the basement room in a clever way from the outdoor garden. (M suggested portholes into the side of a pool built along the foundation wall!)
I would say we’ve accomplished all of these, even number 10, where we managed to get some natural light into the basement, albeit not through portholes from an adjacent pool. $$$$!
It’s always good to set those initial goals at the beginning, and then to make sure that the decisions that you make along the way align with them. It’s really easy to get off track on a project of this magnitude. Thanks for hanging in there with me, and following along on these posts. What’s your favorite part?
love love loving these posts! For some reason I couldn’t see any posts since the start of February these last few weeks – a pleasant surprise when I checked today!
We’ve been thinking about possibly buying the house we’re currently renting – which has led me into dreamland re: a new kitchen… sometimes it seems completely possible but then other times I realize there’s just so much I don’t know! (this week we realized we don’t really know what’s even in our exterior walls… got plaster on the inside and brick on the outside and ___??? in between!) So my hats off to your plans and dreams and awesome-ness here! Looking forward to more!
-Kerri
Thanks, Kerri!
Start by asking the owner if they know. Or ask neighbors, since construction techniques are pretty similar in the same area. If the house is really old, it might be a masonry bearing wall (as ours are), meaning you’d have multiple layers of brick depending upon how many stories you have on the house, and then lathe and plaster directly on the brick. Newer houses have brick veneer, so just one layer of brick, then wood studs (with or without insulation) and lather and plaster or drywall. There are a zillion variations on that, but it’s good to know what you are dealing with, particularly if you are updating electrical, wanting to increase insulation, adding ventilation, etc.
Dreaming (and researching) is cheap – so take your time!
Great advice: “Dreaming (and researching) is cheap – so take your time!” =)
Yes, we are thinking it’s likely a masonry bearing wall construction… although from our various drillings into the walls, we have yet to encounter wood – so maybe just plaster?? It’s a funny thing to realize we’d never really thought about our exterior walls before. From what I’ve been reading on-line, sounds like insulating exterior masonry bearing walls can be tricky since that interferes with the brick’s ability to stay dry…. Have also realized we don’t really have any electrical outlets along our exterior walls – probably related =)
When/if you put in that pool, I’ll rent the garage apartment from you!
Brooke recently posted…Winner, Winner, Early Bird Dinner